How to reduce an image's file size without losing quality
"Without losing quality" needs one honest caveat up front: below a certain point, every method trades something away. The useful goal is to remove the weight nobody can see before touching the weight they can — and there is usually far more of the first kind than people expect. Three levers do the work, and they are not equally valuable.
Lever 1 — Resize first. This is the big one.
An image displayed in an 800-pixel-wide column has no reason to be stored at 4000 pixels wide. And the waste is worse than it sounds, because file size scales with area rather than width: five times the width is twenty-five times the pixels. Roughly 96% of the data in that file can never be displayed.
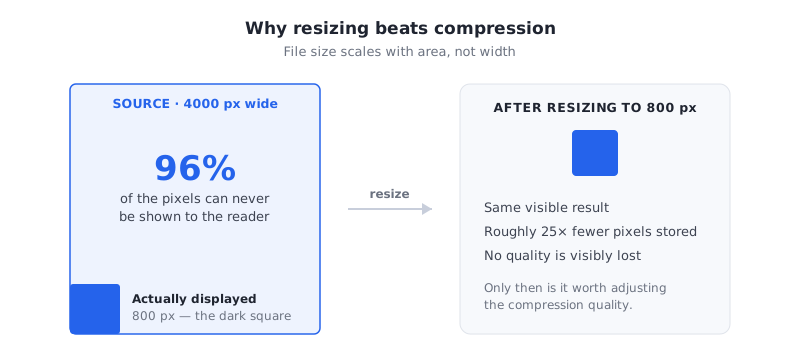
This is the only lever that is genuinely free. Discarding pixels the layout could never show costs nothing visible at all, and it routinely beats anything the quality slider can achieve. One caveat: high-density screens display roughly two device pixels per CSS pixel, so for a crisp result on modern phones and laptops, target about twice your display width — 1600 pixels for that 800-pixel column — rather than exactly the display width.
Lever 2 — Choose a format that suits the content
Format mistakes are expensive. A photograph saved as PNG can be several times larger than the same photo as a good-quality JPG or WebP, because lossless compression has nothing repetitive to exploit in natural imagery. Conversely, a logo or a screenshot full of sharp text saved as JPG both looks worse — the edges smear — and can end up larger than the PNG would have been.
The rule of thumb: photographs want a lossy format (WebP, AVIF, or JPG for maximum compatibility); flat graphics with hard edges want a lossless one (PNG, or WebP in lossless mode). Where you need transparency and small files, WebP is the format that does both.
Lever 3 — Then, and only then, the quality setting
On a lossy format, moving from maximum quality down to somewhere around 75–85 typically removes a large share of the file size while the difference stays very hard to see on a photograph. Below roughly 60 the artifacts announce themselves: blocky patches in smooth areas, halos around high-contrast edges, and visible banding across skies.
Judge it on your own images rather than on a rule, and compare at full size — a thumbnail hides exactly the artifacts you are trying to avoid. If you are working to a hard limit instead of a look, set a target file size and let the encoder find the quality that fits it.
The order that works
Resize to the dimensions you actually need, pick the format that matches the content, then tune quality last and check the result at full size. Doing it in this order matters: compressing hard and then resizing throws away quality you already paid for, and you cannot get it back.
Two habits help beyond the file itself. Always keep the original master somewhere, because lossy compression compounds every time you re-save. And if these images are going on a website, remember that compression is one layer among several — serving several widths through srcset, lazy-loading anything below the fold and putting a CDN in front of your assets all compound with the savings you just made.